
[Spring] 1. 개발 환경 구축, 스프링 구조 설명
○ 통합 개발 도구 다운로드
- https://spring.io/tools > Spring Tools 4 for Eclipse > WINDOWS 64-BIT
- 스프링 공식 홈페이지에서 STS를 다운로드
- 다운받은 spring-tool-suite-4-4.7.0.RELEASE-e4.16.0-win32.win32.x86_64.self-extracting.jar 압축해제
- 압축 해제된 폴더에서 contents.zip 압축해제
- sts-4.7.0.RELEASE 폴더에서 SpringToolSuite4.exe > 바탕화면에 바로가기 아이콘 생성
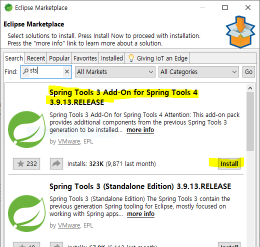
- STS 실행 후 상단 메뉴바 Help > Eclipse Marketplace > sts 검색 > Spring Tools 3 Add-on 설치

- 상단 메뉴바 File > New > Other > Spring > Spring Legacy Project
- Perspective를 Spring으로 변경 > Package Explorer > Spring Legacy Project
- Spring Legacy Project 항목이 존재한다면 애드온이 알맞게 설치된 것이다
(존재하지 않을 경우 애드온 삭제 후 재설치)
○ 프로젝트 만들기
- Spring Legacy Project > Spring MVC Project

- Project name : 01.hello ▶ 작업한 내용이 저장될 폴더로서 큰 의미가 없음
- import 대화상자가 나올 경우 Yes 선택(최초 1회)
- Project Settings(package name) : com.hanul.web ▶ 마지막 단어가 요청 Url이 된다
※ localhost/hello localhost:port/hello
※ IP주소/hello IP주소:port/hello
※ 127.0.0.1/hello 127.0.0.1:port/hello
○ Tomcat Server(WAS) 설치 및 프로젝트 등록
※ Window MenuBar > Show View > Servers
> Click this link to create a New server...
> Apache > Tomcat v8.5 Server
> Tomcat installation directory ▶ C:\tomcat
> Add and Remove : 프로젝트 등록
※ Ports 번호 변경
> HTTP/1.1 8080 → 80변경
(80번 포트가 http 기본 포트인데, 이렇게 해두면 주소 뒤에 포트 번호(ex : 8080)를 안 붙여도 된다.)
※ 방화벽 설정 창이 나올 경우 액세스 허용 선택 ※ Ctrl + F11로 실행할 경우 url 오류로 인한 404 응답
※ 웹브라우저에서 직접 실행
▶ localhost/hello
▶ IP주소/hello
▶ 127.0.0.1/hello
○ STS 인코딩 설정 변경 ▶ UTF-8
- Window MenuBar > Preferences > General > Workspace > Text file encoding : Other ▶ UTF-8
- Web > CSS Files, HTML Files, JSP Files > Encoding ▶ ISO 10646/Unicode(UTF-8)
○ web.xml에서 인코딩 필터 설정
- 기존에 request.setCharacterEncoding(“utf-8”);을 필터로 설정하자
|
<filter> <filter-name>encodingFilter</filter-name>
<!-- 작성할때 .java 파일같이 자동 완성되는 곳에서 작성한 뒤 잘라온다 --> <filter-class>org.springframework.web.filter.CharacterEncodingFilter</filter-class>
<!-- 초기화 됐을때의 파라미터를 지정 --> <init-param> <param-name>encoding</param-name> <param-value>utf-8</param-value> </init-param>
<!-- forceEncoding지정 : 입력한 인코딩으로 강제세팅 허용 --> <init-param> <param-name>forceEncoding</param-name> <param-value>true</param-value> </init-param> </filter>
<filter-mapping> <filter-name>encodingFilter</filter-name> <url-pattern>/*</url-pattern> <!-- 모든 요청에 대해서 이 필터를 거치게 함 --> </filter-mapping> |
※ 인코딩 설정, 필터 설정 후에는 한글이 올바르게 출력되는 것을 볼 수 있다.